It’s been a very long time since I’ve posted on this Blog, and in big news, I now have a 12month old. When I was pregnant I tried to do a bit of research into ways reducing waste with bringing a tiny human into the world. It seemed tough.
Nappies was the first on the hit list – the average baby uses 4000 – 7000 nappies (depending on where you source your information), and the regular disposal nappies on the market take minimum of 300 years to break down in landfill. Nope, I was not going to let that happen.
Clothing was next – babies grow at an incredible rate, so how do you not buy a million things, and what happens to them afterwards?
Bottles – plastic bottles need to be replaced every 3months, so glass was an easy choice there.
General stuff – you google ‘what do you need when you have a baby’ and the list is endless.. I put together a spreadsheet, and added up it would cost ~$10K to buy new everything that the web suggested you might need for a newborn. Why do they need all that stuff??
So, now, it’s been a year, and I thought I would share some of my experiences.
I was determined to not allow >4000 nappies to sit in landfill for over 300 years, so when I was pregnant I started doing a lot of research into nappy alternatives. The first thing my mother, and mother-in-law said to me was ‘oh, just get a nappy service! We had those when you were kids’ – well, not so easy to find these days (if someone needs a business idea, I think it’d be a very lucrative business).
The next thought was ‘eco-nappies’ – there are a couple of brands out there, of varying ‘eco’ credentials and costs. The last thought of course, was cloth nappies. So, here’s my experience.
Nappy Service
If you google ‘nappy service Melbourne’ a few hits come up. When I was googling (over a year and a half ago), I had varying success with responsiveness, and accuracy of listings. I was able to get a really quick response from Australian Cloth Nappy – who have a trial pack that you can rent and then work out which nappies work best for you to go forward with. Botanic Baby also came up, but from memory they were fully booked for the Nappy Wash service when I enquired. However, looking at costs, the costs I was quoted for the nappy wash services were around $30/week – if you run that over 2 years, you are looking at over $3,000.
Eco Nappies
So, EcoOriginals seemed to be leading the way with sustainable nappies, made entirely of plant based materials, so easier to breakdown over time. On subscription they work out to around 74c per nappy. So, for 2 years of use, you are looking at around $3,700. There’s a few others too like Comfy Koalas.
I also investigated ‘home compostable’ nappies (as we know there is degradable, bio-degradable, compostable, and home compostable, which tells us how bad these things truly are for the planet). So, we have Eenee Nappies – Eenee repute to be Australia’s only compostable nappy, and there is a caveat to that. It’s not really a disposable nappy, it’s a hybrid of reusable cloth and compostable inserts. Cost is around the same as EcoOriginals.
Cloth Nappies
I began to do some research into cloth nappies – soooooo many to choose from out there these days. I came to the conclusion that a short term nappy hire (from someone like Australian Cloth Nappy, mentioned above) would be a good way to try a few different styles, and see what worked for us.
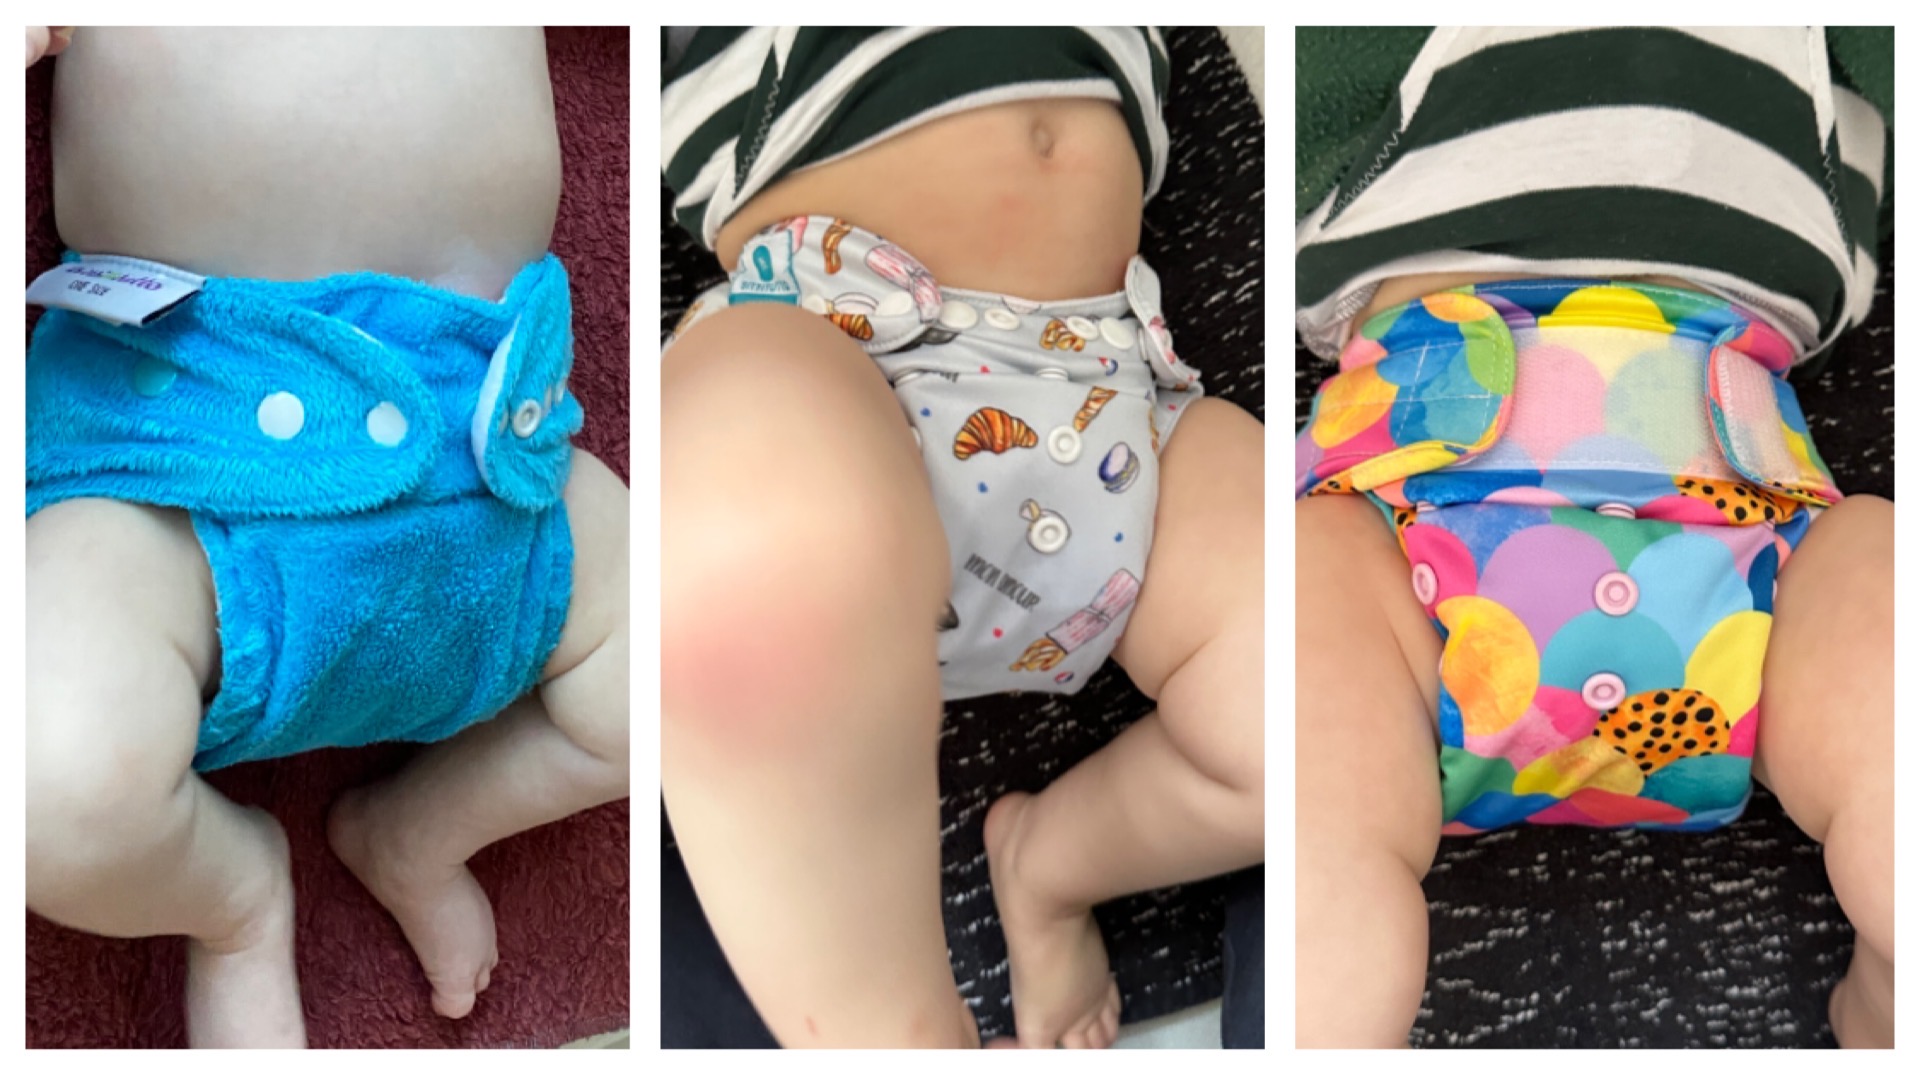
However, I was then extremely fortunate to have a friend give me her entire set of 32 cloth nappies and inserts, that she had purchased for her son, and hadn’t really used. These were the Itti Bitti Tutto nappies. Minky style (super soft on the outside) and a slim bamboo insert. We started using them from the day we returned home from hospital (day 5). They buttoned up to tiny size for our 3kg wonder, and they were lovely and soft on bub’s skin. I got into a routine of a bi-weekly wash (60C Hygiene cycle), and off we went.
This worked really well, until my daughter started sleeping a little longer at night.. once we got to 4-6 hour sleep blocks, she was wetting through. I watched a tonne of YouTube videos to try to see what I was doing wrong – was I not fitting the nappy right, or tucking her legs in properly etc. Couldn’t find fault. I resorted to buying some waterproof ‘covers’ for the nappies from Designer Bums, on sale. So, I would layer up bub, with the minkies, multiple inserts and an extra cover over the top. This worked! .. for a while. At around 4-5 months, we started getting a bit of leakage during the day (not to worry, change the pants, put them out to dry and swap again at the next nappy change 2 hours later…). Once our daughter was at child care we would be providing 3-4 changes of clothes for her each day.
Fast forward to around 9-10months old, and we start getting leaks at night. Badly. Three out of four nights, we would be wet through the nappy, the pyjamas, and soaked the sleep sack. I had tried the Designer Bums nappy with its own inserts, and also had a Bare & Boho nappy that someone had given us.. none any better. It was at this point that I decided it was time to investigate a new nappy.
After some online research I came across the Cloth Bums Knight 2.0 Nappy – it seemed one of the only companies that had a specific night nappy design. I bought two, skeptical that they would work when the others seemingly had not. The Knight nappy comes with three inserts – a ‘trifold’ which sits in a back pocket, and two bamboo soakers for inside the nappy. It also has extra elastic at the legs, and two press-button wide waist band so once in position it stays there. It is bulky, and I mean, super bulky – you can squeeze it (‘taco-it’ together), so that between the leg width there is less width, and that pushes the bulk down between the legs, meaning depending how long you child is you may need to go up a size in the pyjamas or you won’t be able to zip them up anymore! The result – dry baby. Our daughter sleeps for 12 hours, and this absorbs like nothing else I’ve tried, not a single leak from legs or waist. We also only use the trifold and one bamboo insert, so we have room to increase absorbency capacity if needed.
After a great success with the Cloth Bums night nappies, I decided to buy some more, and also start to swap over my day nappies. Cloth Bums has a Velcro option for the day nappies, which sounded amazing, as my mother-in-law was starting to really struggle with the press-buttons.
Image above shows from left to right: the original Itti-Bitti nappies, when bub was very little; the newer Itti-Bitti nappy (that still leaked for us); and the Cloth Bums Velcro nappy.
Itti Bitti recap – I contacted Itti Bitti, to explain the leaking, and question the durability of the nappy – the elastic was gone in around 85% of the nappy shells, hence the leaking. They wrote back and suggested that the nappies I had were over 10 years old (yes they were ‘second-hand’ from my friend), and as such it was not a surprise that the elastic had gone, and that the nappies ‘had a great life lasting 10 years’.
Cloth Nappies are not cheap – around $25 each if you can get them on sale. I wash twice a week, and I have 5 night nappies, and 27 day nappies (with as many inserts), and a handful of the old Itti-Bitti ones that haven’t completely lost elastic, for use an hour before bed. So, around $500-600. Add to the washing, water and electricity to do the washing, yes you add a bit more $ for maintenance. (Still cheaper than 2 years + of disposable nappies). When I’m done with the cloth nappies, the companies take them back to upcycle.
The Up-Shot
Pros: reduce (a lot of) waste, save money.
Cons: washing, time to hang and fold nappies, bulky.
I’m super glad we went down the cloth nappy path. I think for our newborn (~3kg), the slimmer Itti-Bitti was perfect. As she has become more active and drinks more liquid, the watertight, more absorbent Cloth Bums are gold.
Would love to hear from your experiences, or answer any questions. Hope this is useful for someone else’s nappy journey!
2014 seemed to be the year of Superhero parties. I was turning 33 last year, and decided I would host a party, with a superhero theme. I had decided this some time before a friend of ours announced a hero and villain party.
Given my pre-planning obsession, I had also already selected a suitably random superhero for my own birthday party, so this required some further thinking on my part to find a second (super)hero to dress as to attend the friend’s party, which of course, preceded mine (meaning I couldn’t go as the same character)!
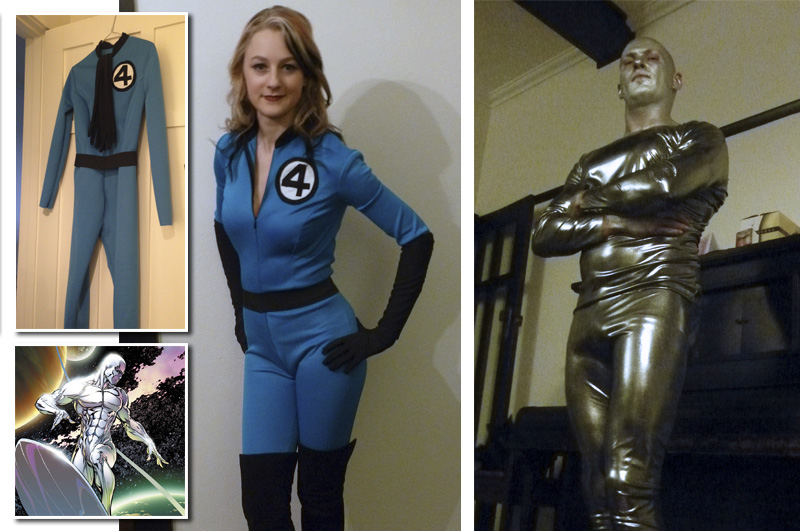
Invisible Woman
For my own party I had chosen The Blonde Phantom. A 1940s heroin, she was little known, but had a great costume (without the skank-quality of some of the later heroines), as well as being a clever woman. Technically she didn’t have any superpowers, but she had a little mask, and carried a hand gun.
So, for our friend’s party (which was early winter) I chose to go as Invisible Woman – one has to consider the weather when planning these sorts of things (nothing I hate more than being cold).
There appeared to be a few iterations of her costume throughout the years, but the key components seemed to be: blue fitted suit, black boots, black gloves, black waistband and collar, and of course the number 4 on the chest.
And of course, being a sew-er.. I had to make my own costumes.
Given the wintery nature of this outfit, I wanted to go for a Ponti knit, but couldn’t get the right shade of blue. Instead I settled for a scuba fabric, which had the right sort of look, however I discovered (a little too late) it wasn’t quite as stretchy as I had hoped.
The basic format of the pattern was to make leggings, a fitted top and then sew them together. The leggings had to be remade, as I had used a pattern of other leggings I owned, but then discovered the scuba fabric wasn’t as stretchy… and I couldn’t get into the leggings.. so they got re-cut as my sleeves.
The Number 4 I did in felt and appliqued onto the upper front. Invisible zip up the middle front, and a black jersey fabric upright collar.
I had to make a few amendments to the back of the leggings as well (did not think out that pattern very well before cutting it) – and used a wide black elastic as the waistband. The black gloves I already had (from a 1920s outfit!) and the black boots are my enormous Tony Bianco black suede heels…
My husband also got a costume – we chose Silver Surfer for him, and whipped him up some supertight leggings in silver 😉
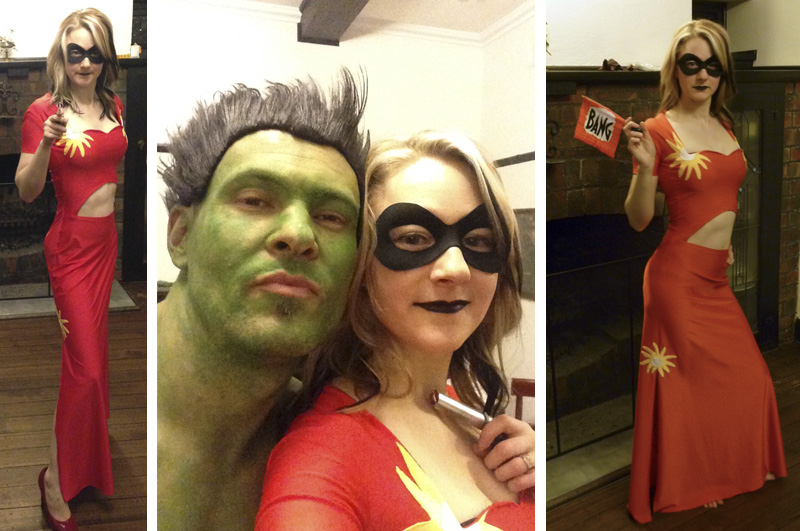
Blonde Phantom
Meanwhile, I had to start planning my own birthday party costume. I gathered pictures of the Blonde Phantom so I could get the design of the costume right. The key components were the red, flowing skirt; the exposed midriff; the sweetheart neckline, and the little sun details at the corners (and of course the black face mask).
Getting into the theme, I sent out the party invites, dressing myself as my character for them (as an obscure superhero, I felt I wasn’t really giving anything away by letting people know what I was going to wear.. (If anyone else would like me to illustrate them as a comic strip, please let me know).
And then it was time for the fabric choice. As a generally natural fabric gal, I had never *ever* used Spandex before, in my entire sewing history – never purchased, never sewn, never touched. The nature of this costume though.. seemed I had no other choice.
But, gosh, was it easy to work with!! Red spandex for the entire dress – no darts needed, no gathering, no zig-zagging.. why have I never used this before!? I also got yellow and white spandex to do the detailing, so the whole dress would move and stretch as one.
I interfaced the little suns, and straight stitched them on (appliqueing those warped the fabric something shocking).
The bodice was double lined at the front to ensure clean lines and no funny hems at the mid-riff cutout and sweetheart neck line.
I purchased a little black mask and cut it down to size… and of course made a cake to match the colour and comic theme…
And the last but not least touch, I purchased me some black LimeCrime lipstick… divine… not ever having been a goth, there was something really lovely about wearing black lipstick (matt black) and I wish I had an excuse to wear it more often!!
Oh, and the little gun.. that went ‘Bang’ when you fired it. My hubby went as the Hulk – much easier costume then the Silver Surfer – this time I just dyed his old pair of jeans purple and ripped off the bottoms!!
Whilst at the Clegs remnant sale, I snagged myself two lovely pieces of Ponti (or Ponte) fabric. The versatile, stretchy, dense fabric that is my latest favourite all purpose fabric. One piece was black and white striped, the other taupe. My mission, to make some more high waisted ‘midi’ skirts for my Summer wardrobe – I already had a dark denim and black high waisted skirt, and the black is not so conducive to a hot day.
One of my favourite looks for work is a high waisted skirt with blouse, shirt or knit tucked into it. It is also great with a short cardigan (of which there are many in the fashion books at the moment).
The striped skirt is based on my own simple pattern, a front skirt piece and a back skirt, with a wide waistband at the top. The stretchy fabric means no need for a zip (too easy).
After purchasing the Vogue Pattern 8866 for the “Pretty Girls Sew” jacket challenge last year, I have been working through the other outfits in the pattern. The top within the pattern is fabulous, and I made that last year (I should blog that one too); and so with my taupe ponti I tried the skirt pattern.
The pattern is great – really good fit (needed to take it in a little bit for my size), but is super comfortable and looks great for work and day wear. Given the very stretchy nature of the Ponti, I actually removed the zip from the pattern, and added a wide waistband for a more “high waisted” skirt look.
I’m so impressed with the pattern, that I’m going to make another one.. and possibly the dress version for Autumn/Winter – all out of Ponti!!
Re-acquainting myself with my blog, I realised I posted *one* post last year… – that is appalling. So, to you my followers, I apologise. I will try harder this year!
I had a short break from work over the summer and started to get my summer wardrobe into order (long overdue). I did also go to the Clegs remnant sale… so picked up lots of lovely fabrics there.
However, first cab off the rank -I should go back to a blouse I finished that I never uploaded. I finished the blouse June 2014.. I started the blouse June 2013… my excuse was that i was waiting for buttons. I was waiting for buttons, but not for that long!
You may notice it is very similar in pattern to my Spring Blouse that I had previously made. It is the same pattern (one of my own poorly drafted patterns), but I was pleased with the previous success, so I did it all again! The difference with this one is the sleeves and neck tie are both chiffon – that was mainly due to the limited fabric I had for the body of the blouse.
And yes, the fabric has tiny cat heads on it – what else was I supposed to do with it, but make a Cat Blouse.
Alright, I’m on Instagram and follow the @prettygirlssew, who have monthly sewing challenges – they choose a pattern and everyone sews along. This was the January-February challenge, that I thought I’d have plenty of time to complete.. but I only just finished 😦
Anyway, it is done now, and I’m very pleased with the result. The pattern chosen for the month was Vogue 8866, which included a short trench coat with a very flouncy peplum. As I cut the pattern, I decided there was a bit too much flounce for me, so I edited that component of the jacket to a more conventional peplum cut.
I chose a navy outer, and a green, white and navy geometric print to line the jacket and to accent it – buttons, belt pockets, collar (if you haven’t guessed, I’m choosing navy and green as two of my stable colours for the upcoming autumn/winter season).
I had the buttons and belt made by the lovely Kate at Buttonmania, here in Melbourne. The Vogue pattern is great – good fit, and probably the only thing I’d change is the pockets (make them actual pockets) and add little tabs to hold the belt in. The pattern also comes with a great top/dress, which I’m presently busy making outing a ponte fabric, for the autumn.
Simplicity 1777 – So, I saw this pattern in the catalog, and because it was Vintage/Retro I had to buy it! For a long time I didn’t have any fabric that was appropriate, and then I received a gift voucher for Tessuti for my birthday… and I found the “Noon Yesterday Ponti – Digital Print” fabric – it was perfect!!
I set to work laying the pattern out carefully to fit the repeats evenly into the pattern pieces.
As usual I had some assistance from my fluffy friends.. The pattern was really good – it was a little bit fiddly around the pleated detail at the waist and hips, but the end effect was well worth the effort.
The fit was amazing – perfectly contoured to fit the body. I went for the 3/4 sleeves in the end, and the dress is a lovely ‘important work meeting’ day dress. So all in all, I was very stoked with the end result.
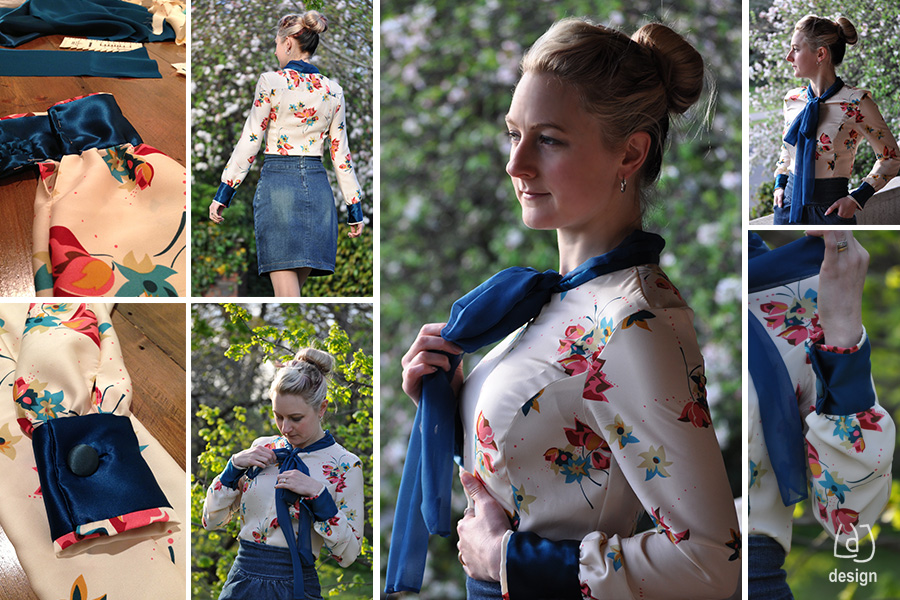
Last year, or perhaps the year before.. my friend and I went to the Alannah Hill Outlet, where the lovely people of Alannah Hill sell off rolls fabric that they are no longer using, and remants (I really should go back there again!). I picked up this remnant gorgeous creamy, slightly stretchy, floral print – thinking that it would make a really nice blouse.
Much time passed before I was finally both inspired and confident to cut the fabric into a blouse. I really wanted to make a long sleeved blouse – and there was not quite enough fabric.. so I cut out the main pieces, and had to cobble together the back yoke by sewing the offcuts back into a useable piece of fabric!
I also didn’t have enough fabric for collar or cuffs… I really wanted contrasting details – and was hoping to be able to get fabric that was the dark green-teal colour that some of the floral pattern had. Unfortunately, no fabric store had that colour. I also wanted to have silk satin cuffs, and matching silk organza collar tie. I tried a an orange.. didn’t work, and I didn’t want pink.. so I ended up settling for the dark blue you see here. I was really please with the end result, it picked out a nice highlight in the blouse colours.
The cuffs I spent a bit of time on – I’m really starting to dislike regular button holes.. so for the cuffs I used bound buttonholes instead, which produced a much lovelier outcome. The blouse has an invisble zip up the centre.
Okay! So, when my husband’s expensive, fine wool suit work pants wore away to a form a massive hole in areas where there should not be holes.. I thought ‘90% of this fabric is in perfect condition, what a waste it would be throw the pants out’.
So I got thinking about what could be done with the suit pants material. I unstitched both legs so I ended up with two sizeable pieces of fabric. I salvaged the silk, paisley waistband lining, all the buttons. Placing the two legs upside down on my dressmakers form, I realised that if cut the legs cleverly I would have enough fabric to make a pinafore.
Using a rough pattern of another dress, I cut two upper bodice yokes – front and back to get the neckline. This was taken from the hip area of the pants where the fabric was broad enough to fit a pattern piece, and added details of pockets that give an indication of what the fabric used to be.
Looking at the photos, I can see I really need to iron the dress – so apologies! However, once I had laid out the pants as the dress form, I added diagonal darts (took that idea from the 1960s vintage pattern). I cut the dress reasonably short, given that the fabric is quite conservative. Sewed it all up, lined the yoke.. and then put together a little belt from the salvaged waistline fabric. Voila! A pinafore from hubby’s old pants. (There is another pair of pants waiting in my sewing room to be converted into something… maybe a bodice..)
PS. The dress is super easy to wear, and breathable – they do make these suits out of lovely fabric!
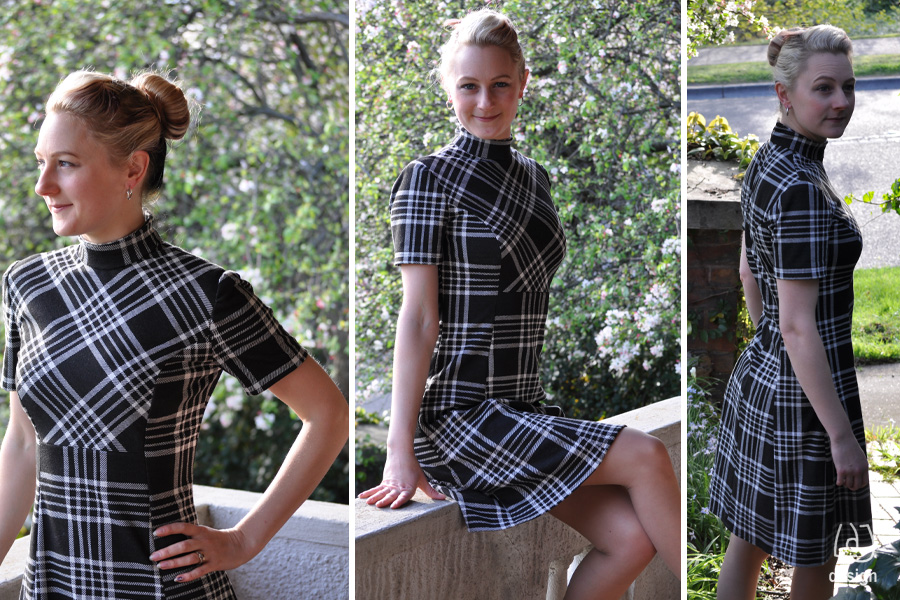
So, among my Vintage pattern scoop, I also got hold of this 1974 “Style 4409” pattern. Perfect for knit fabrics, I found some discount knit fabric at Spotlight (I think it was reduced to $2/m or something equally ridiculous!) – and decided to give it a go.
The sizings are always a little bit pot-luck with the old patterns – so i had to trim it down quite a lot by the end, and as a result the neck was a little cosy. But, again, this dress is super comfortable – the stretch fabric fits really well, and I will be making another dress with this pattern, in other fabrics for the summer – possibly a dress without the sleeves; and I might just need to make a winter version with long sleeves too!
I cut two pieces for the centre front on this pattern, so I could have fabric pattern on the diagonal in the upper bodice.